Pages

Sunday, August 25, 2013

iPad, iPhone External Monitor Screen Display


Your iPhone, iPad or iPod Touch is great for on-the-go computing, and the screen size is fine for your needs. But be honest - aren't there times when you gaze longingly at your giant desktop monitor, and think "what if"? Wouldn't it be great to take your tiny iPhone display and put it up on the big screen?

This is not a wild and crazy idea. It is doable - with a simple accessory for your iPad, iPhone or iPod Touch iOS device. I am creating this post now using the Notes App displayed on my Dell 24" monitor, and I am loving it more by the minute!

Why an external display?
Here are a few reasons people might want to display their iOS device on a PC or Mac Monitor:

  • Business presentations
  • Party sharing - sharing iPhone videos, apps, games to a number of friends
  • Teacher presentations using a VGA projector
  • Long term "real work" - better ergonomics for students, writers and others that have traded in their laptop for an iPad

How to show your iOS display on your large monitor
All you need is a compatible VGA adaptor for your iPad or iOS device to make this work. No special software, apps, etc.  Brilliant!  With the adaptor, here's how it works:
Apple 30-pin to VGA Adapter


  1. The adapter plugs into your iPad / iPhone charging slot.  On the other end is a (female) VGA connector.
  2. Plug your monitor's (male) VGA cable into the (female) iPad VGA adapter connector.  (Just like you would connect the monitor to a laptop).
  3. Turn on your iPad, iPhone, iPod Touch.  The phone/tablet screen will also show on your large-screen desktop monitor! 


iOS / VGA Adapter - which one should I get?
I have an iPad 3, with the 30-pin connector. For 30-pin connector iOS devices you need the Apple 30-pin VGA Adapter. I found a similar 30-pin VGA Adapter on Amazon for less (make sure you check out reviews on non-Apple accessories to make sure you don't get a lemon).

Apple Lightning to VGA Adapter


If you have an iOS device with the new Lightning connector (like the iPhone 5) you need a different adapter, the Apple Lightning VGA Adapter.

If you are unsure which adapter your iOS device needs, use this Apple summary of the correct VGA adapter for various iOS devices.


Testing - some limitations
The iPad 3 works great with the 30-pin VGA Adapter.  However, if you have lightning connector devices, and want to use the lightning to 30-pin Apple converter, my testing shows this combination does not work for monitor displays.

I tested the following:

  • iPad Mini => Lightning to 30-pin Apple converter=>30-pin VGA Adapter=>VGA Display
  • iPod Touch 5th Generation => Lightning to 30-pin Apple converter=>30-pin VGA Adapter=>VGA Display
 Both of the above combinations do not work.  No video output occurs on the VGA Display. You need a direct connection with the Apple Lightning VGA Adapter for video output. (Amazon reviews confirm lightning pin iOS devices (e.g. iPhone 5) do display on VGA displays using the Lightning VGA Adapter cable.)

Lightning to 30-pin Adapter does not work for VGA display


This is disappointing.  If you have legacy 30-pin Apple devices and some new lightning connector Apple devices, you need to buy two expensive VGA adapter cables if you want each respectively to use a VGA monitor. The 30-pin Apple converter by itself won't let a lightning device piggyback off the 30-pin VGA adapter.


Also tested was the iPod Touch 4th Generation=>>30-pin VGA Adapter=>VGA Display combination.  Apple's documentation says this works for "video out" but not "video mirroring". My testing shows this to work, albeit with the stated limitation. Unlike my iPad 3, plugging in the fourth generation iPod Touch, you will not see on the monitor what you see on the iPod. The home screen, apps, Internet will not be "mirrored" on your desktop display. However, "video out", i.e. streaming video, will show on the display. For example, YouTube videos from your fourth generation iPod touch will display on a large monitor.

Sunday, August 18, 2013

Sharing the Apple Keyboard with Multiple iOS Devices


Lessons from sharing the wireless, bluetooth Apple Keyboard amongst a family's mobile Apple devices.

On a family vacation recently, the wireless Apple Keyboard proved a popular accessory to have handy. Blogging, long emails and creative writing were way easier with the bluetooth keyboard!

Of course to facilitate keyboard sharing, one needs to know how to share the Apple Keyboard with different devices.  Bluetooth is a slick technology, but it also has made device sharing more complicated than simply passing the keyboard to the next person. The bluetooth Apple Keyboard is a true believer of Serial Monogamy - once "paired" with a device, it will not connect with any other device until "unpaired" with the original.

The key to sharing the keyboard is knowing how to pair and unpair it easily. Fortunately for Keyboard Sharers, this bluetooth keyboard does not dwell on the past, and will freely "move on" to its latest device!

How to Pair / Unpair the Bluetooth Apple Keyboard

Here's a simple example, sharing a bluetooth Apple Keyboard with iPad A (a regular iPad) and iPad B (a mini iPad). The same sharing steps would apply to other iOS devices - the iPhone and iPod Touch.

1. The Apple Keyboard is being used by iPad A. iPad B may also be on and in the vicinity, but no matter, iPad A is bluetooth-paired with the wireless keyboard and will have nothing to do with iPad B. But what if we want to switch so iPad B can use the keyboard?
2. Unpair the Bluetooth Apple Keyboard from the first iPad. Remember, the current relationship has to end before a new one can commence! The easiest way to "unpair" the bluetooth keyboard is to turn off Bluetooth on the iPad it is currently "paired" with, i.e. iPad A. Do this: Settings App > Bluetooth >OFF.
3. It may also help to power off the Apple Keyboard to complete the unpairing.
4. While Bluetooth remains OFF on iPad A, turn on iPad B and make sure Bluetooth is ON for that device (Settings App > Bluetooth > ON).
5. Turn on the Bluetooth Apple Keyboard. With iPad B Bluetooth on, and iPad A Bluetooth off, it will switch allegiances and pair with iPad B. When iPad B shows "Apple Keyboard Connected" it can now use the Apple Keyboard.

Remember, iPad B is now the sole focus of the keyboard, and you must "break them up" before your Apple Keyboard can be shared again. Just repeat the 5 Step Pair / Unpair process again.

Happy keyboard sharing!

Also Related:


Saturday, August 10, 2013

Notes App & the Case of the Disappearing Notes

The Case: Notes Mysteriously Vanish from iOS Notes App


The Notes App is a wonderful tool for capturing short notes, to-dos, ideas, etc. I'm a big user of the app, especially now that I can create Notes App folders, and have well over 100 notes. The idea of losing all these notes, turning on my iPad and finding they have vanished into thin air, makes me shudder.

Yet I see this very problem of lost notes crop up time and time again, reported by users in various iPad forums. It can be an incredibly frustrating experience, and, unfortunately, is incredibly easy to inadvertently bring about. Fortunately, we have here a happy ending – let's solve the Case of the Disappearing Notes.

The Clue: How the Notes App Syncs
The main clue to the lost notes is not intuitive: it has to do with how iOS syncs notes. iOS always uses your email address to sync your notes. If you accidentally choose to turn off this note syncing, iOS doesn't copy the notes to your iPad, it simply removes them! Fortunately (and this is the benefit of synchronization) copies of the notes remain in your email account. If you turn notes syncing back on, the notes will all magically reappear on your iPad!

Solving the Case: Watch what happens as Notes syncing gets turned on / off
Let's go through an example and see what happens when Notes syncing gets turned off and on.  We'll try to catch our Notes thief in the act!  (Although I refer to the iPad throughout, instructions equally apply to the iPhone and iPod Touch, although screens slightly differ.)

1. We'll start simply: our iPad has the vanilla Notes setup with no syncing.  All notes are saved locally on the iPad.  You can tell because the black title bar only a shows a count of notes.   The title bar does not say "Accounts", which it will if your Notes are synced.


2. Now to start syncing our notes.  Go into the Settings app and tap Mail, Contacts, Calendars. (Screen shows how it will look on your iPhone).


3. Then tap your primary e-mail account; in this case, Gmail.


4. This screen shows syncing options for your e-mail. Currently my notes I create in the Notes App are not synced. I want to change this.


5. I flip the syncing option for Notes to ON.  Now, I will have the option to create Gmail-synced notes going forward.  ( Notes I previously created will remain only on the local iPad and not be synchronized.)


6. Now when I return to the Notes app, the title bar includes the "Accounts" button. Notes syncing is now active.  We tap "Accounts".


7. The Accounts tab has a few options.  Basically, you can now choose to view/create Notes that are only on your iPad ("On my iPad") or Email-synced Notes (your email address the notes are synced to shows, in our case, "@gmail.com".  "All Notes" let you see all notes, regardless of category.  

8. We tap on the Gmail account.  No notes currently exist that are Gmail-synced. I'll create a short test note.


9. Now in our Notes list, we have our first Gmail-synced note. There is a count of 1 note in the synced account category (there are still 4 notes from before in the "On my iPad" other category).


10.  OK, the scene is set; we have a note in our synced-Gmail area.  Now let's turn off syncing and see what happens to the synced note.  I return to Settings > Mail, Contacts, Calendars > Gmail e-mail account. I turn Notes syncing back to OFF.


11. With Notes syncing now set to OFF, I returned to the Notes app. My synced note has disappeared! All I see are my 4 iPad notes and no "Accounts" option. This would look the same even if I had hundreds of synced notes - they would all be gone!


12. My note may have disappeared on the iPad, but fortunately, it still exists in Gmail. If I log onto my Gmail account (above) on the left side you see the Notes folder, and in there is my note. This is a big advantage of syncing your notes with your e-mail account. Not only do you have a backup copy on your e-mail server, you can also get to your notes from other devices, such as a PC. (And if you change a note with your PC, the changes will synchronize on your iPad automatically.)


13. My lost note can be recovered by turning Notes syncing ON again.  Shortly afterward, your e-mail-synced notes, whether one note or hundreds of notes, will re-sync and appear again on your iPad.


14. Notes are syncing again, and my "deleted", vanished note has returned. The Case of the Disappearing Notes has been solved!

Thursday, August 8, 2013

Apple Keyboard: Shortcuts for your iPad

If you are the proud owner of a new Bluetooth Wireless Apple Keyboard for your iPad, and, like me, have not used Apple devices prior to your iPad - you may be in for a bit of keyboard shock. All the old PC shortcut key standbys - Ctrl+C for Copy; Ctrl+V for Paste: Ctrl+A for Select All - none of these work on the Apple Keyboard!


Fear not, the equivalent shortcut keys are there on your shiny, new wireless Apple Keyboard, but just in a slightly different manner.

By substituting the Command key on the Apple Keyboard for the Ctrl key you can replicate most of the primary PC keyboard shortcuts.

Here are keyboard shortcuts for use with your iPad, as reported by Apple Support Discussions user Benjamin Lewis in this post:
CMD – c (Copy selected text)
CMD – x (Cut selected text)
CMD – v (Paste)
CMD – z (Undo)
CMD – e (End of Line)
CMD – a (Beginning of Line)
CMD – k (Delete To End of Line)
CMD – f (Cursor Forward)
CMD – b (Cursor Back)
CMD – n (Next Line)
CMD – p (Previous Line)
CMD – shift – z (Redo)
CMD – Up Arrow (Jump to top of document)
CMD – Down Arrow (Jump to bottom of document)
CMD – Left Arrow (Jump to beginning of line)
CMD – Right Arrow (Jump to end of line)
CMD – Delete (Delete everything on the current line to the left of the cursor)
Option – Delete (Delete the word to the left of the cursor, and its preceding space)
F1 (Dim Screen)
F2 (Brighten Screen)
F7 (Back one song)
F8 (Play/Pause Music)
F9 (Skip one song ahead)
F10 (Mute) F11 (Volume Down)
F12 (Volume Up)
Eject key (Show/hide on-screen keyboard)
Option – Shift (Any letter or number, alternative character)
Shift – ↑(Select the Text Above)
Shift – ↓(Select the Text Below)
Shift – ←Select the Text on the Left)
Shift – →(Select the Text on the Right)
Shift – CMD – ↑(Select All Text to Beginning of Doc)
Shift – CMD – ↓(Select All Text to End of Doc)
Shift – CMD – ←(Select All Text to Beginning of Line)
Shift – CMD – →(Select All Text to End of Line
Shift – Option – ↑(Select the Text Above, Line by Line)
Shift – Option – ↓(Select the Text below, Line by Line)
Shift – Option – ←(Select the Text on the Left, Word by Word)
Shift – Option – →(Select the Text on the Right, Word by Word)
Keep this little keyboard quick reference handy and you'll soon be as comfortable on the Apple Keyboard with your iPad as you are with your PC laptop keyboard. (Note: the Bluetooth Wireless Apple Keyboard works fine with all iOS devices, i.e. the iPhone, iPad and iPod touch.)

See Also:
How to Setup the Apple Keyboard with your iPad

Sunday, August 4, 2013

Setup the Apple Keyboard with your iPad


If you've taken the leap into the iPad's next frontier - using the iPad for work - the Bluetooth Wireless Apple Keyboard can be an essential add-on.  I'm typing this on the Apple Keyboard now and it definitely works with the iPad (and all iOS devices).

But the setup instructions that come with the Apple Keyboard neglect to mention the iPad, only provideing a Mac pairing how-to. So, correcting Apple's omission, here's the step-by-step how-to for setting up / pairing the wireless Bluetooth Apple Keyboard with your iPad, iPhone or iPod Touch.

First, go into the Settings App and Bluetooth.  Turn Bluetooth "ON" if is not on already.


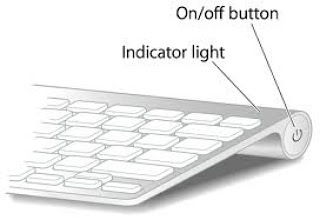
Once Bluetooth is on, press on the Apple Keyboard power button (the silver button on the top right side of the keyboard).  

A small, green indicator light will turn on solid, and then blink in patterns of two.  This is the keyboard "pairing" with your iPad via Bluetooth connectivity.


Under Bluetooth in Settings, you'll see the Apple Keyboard now listed, and it will say "Not Connected". Tap the "Apple Wireless Keyboard" item to connect it.

You'll be prompted with a 4 digit code to enter on the Apple Keyboard.  Enter that code as directed.


After a brief pause, you should see the Apple Keyboard is "Connected".  

You can now use your keyboard anywhere on your iPad where typing is required.  Note: after pairing your Apple Keyboard, your iPad will automatically default to the keyboard for any input.  You may be surprised when the onscreen keyboard fails to popup like normal!

If you want to switch to the iPad onscreen keyboard tap the Apple Keyboard "Eject" key to toggle back and forth between the Apple Keyboard and the iPad keyboard.  

To go back to only using the iPad keyboard, turn Bluetooth "off" or power off the Apple Keyboard by holding the power button untill the green indicator button turns on and then disappears.  To reconnect, turn Bluetooth on, power on the Apple Keyboard, and your iOS device will automatically detect it.

See also:
Apple Keyboard Shortcuts for the iPad.  Quick reference for shortcut keys for Apple's wireless blue tooth keyboard when using the iPad, iPhone or iPod touch (PC users: shortcut keys for copy, paste, undo, etc are different from what you are used to).

Happy keying!